Tips for Your Perfect Strawberry Pretzel Salad
Strawberry pretzel salad, a beloved classic often gracing potlucks, holiday tables, and family gatherings, is a symphony of contrasting textures and flavors. Its irresistible combination of a salty pretzel crust, a creamy, sweet cheese layer, and a vibrant, fruity Jell-O topping makes it a universally adored dessert (or "salad," depending on who you ask!). While many consider it a straightforward dish, mastering the nuances of each layer can elevate your creation from good to absolutely unforgettable. This comprehensive guide will walk you through essential tips and tricks to perfect your next
strawberry pretzel salad recipe, ensuring every slice is a harmonious blend of sweet, salty, and creamy delight.
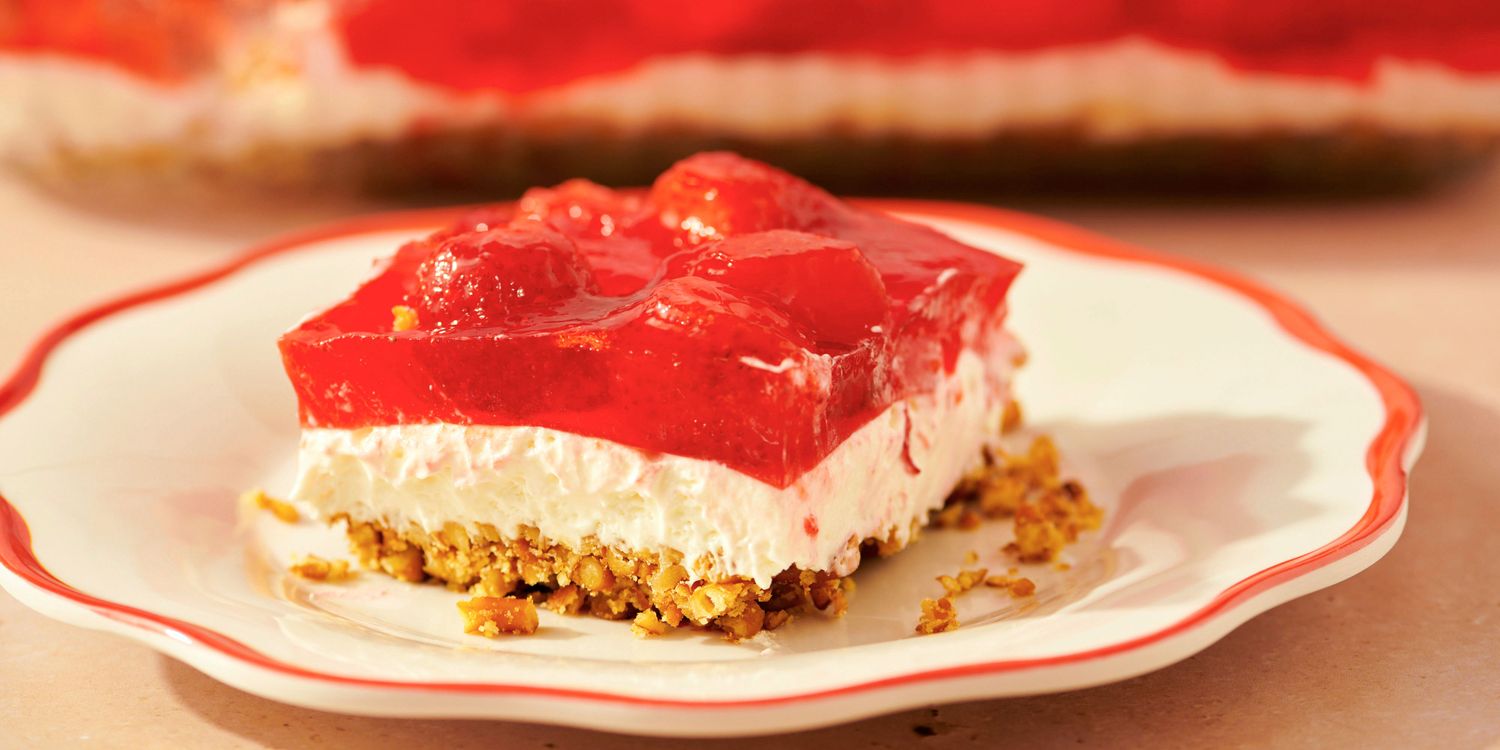
Understanding the Core Components: A Layered Masterpiece
Before diving into specific techniques, it's crucial to appreciate the role each of the three distinct layers plays in the overall experience of your
strawberry pretzel salad recipe:
1.
The Salty Pretzel Crust: This is the foundation, providing a crucial salty crunch that balances the sweetness of the subsequent layers. Its texture and flavor are paramount.
2.
The Creamy Cheese Layer: The heart of the salad, offering a smooth, tangy, and sweet contrast that acts as a protective barrier and a flavor bridge.
3.
The Fruity Jell-O Topping: The visually stunning and refreshing crown, bursting with strawberry flavor and adding a delightful wobble.
Each layer requires attention to detail, and success often lies in the precise preparation and chilling times between them.
Crafting the Ultimate Pretzel Crust: The Foundation of Flavor
The pretzel crust is often underestimated, but it sets the stage for the entire dish. A soggy or crumbling crust can ruin an otherwise perfect
strawberry pretzel salad recipe.
- Choose Your Pretzels Wisely: While most recipes call for crushed pretzels, the type matters. Traditional twists offer a good balance of salt and crunch. Avoid heavily flavored pretzels. For gluten-free versions, ensure your chosen pretzels are certified GF.
- Perfect Crushing Technique:
- Food Processor: The quickest method for uniform crumbs. Pulse until you have a mix of fine crumbs and slightly larger pieces for texture. Avoid over-processing into a fine powder, which can lead to a dense, hard crust.
- Ziploc Bag & Rolling Pin: Place pretzels in a sturdy freezer bag, remove air, and crush with a rolling pin or bottom of a heavy pan. This often yields a more rustic, varied texture.
- The Butter Balance: Melted butter is the binding agent. Use unsalted butter so you can control the saltiness from the pretzels. Too little butter, and your crust will crumble; too much, and it will be greasy. A standard ratio is about 1/2 cup (1 stick) of melted butter for every 2 cups of crushed pretzels.
- A Touch of Sweetness (Optional but Recommended): Adding 1-2 tablespoons of granulated sugar to your pretzel crumbs and butter mixture enhances the "dessert" quality and helps achieve a beautiful golden-brown crust.
- Pressing and Baking for Perfection:
- Firmly Press: Press the mixture firmly and evenly into the bottom of your 9x13 inch baking dish. Pay special attention to the edges to create a good seal.
- Bake It Off: Baking the crust for 8-10 minutes at 350°F (175°C) is crucial. This helps to toast the pretzels, evaporate excess moisture, and solidify the crust, preventing it from becoming soggy later. It creates a crisp barrier for the creamy layer.
- Cool Completely: Allow the baked crust to cool *completely* to room temperature before adding the cream cheese layer. This prevents the cream cheese from melting and ensures the crust retains its crispness.
Achieving Dreamy Cream Cheese Perfection: The Sweet & Tangy Heart
The cream cheese layer is the luscious, smooth, and slightly tangy counterpoint to the salty crust and fruity topping. Its consistency is key to a stellar
strawberry pretzel salad recipe.
- Room Temperature Cream Cheese: This is non-negotiable! Softened cream cheese (full-fat for best results) whips up smoothly without lumps, ensuring a velvety texture. Take it out of the fridge at least 30 minutes to an hour before you start.
- Sweetener and Flavor:
- Granulated Sugar: Dissolves well and provides sweetness.
- Vanilla Extract: A splash of good quality vanilla enhances the flavor significantly.
- Powdered Sugar (Optional): Some prefer powdered sugar for an even smoother, less grainy texture, though granulated sugar works perfectly fine with thorough mixing.
- The Whipped Topping Factor: Most recipes call for frozen whipped topping (like Cool Whip), thawed. This lightens the cream cheese mixture, making it airy and easy to spread while also adding stability. If you prefer, you can use homemade whipped cream, but ensure it's very stiffly whipped for stability.
- Mixing Technique:
- Beat the softened cream cheese and sugar together until light, fluffy, and completely smooth. Scrape down the sides of the bowl often.
- Gently fold in the thawed whipped topping. Use a spatula and a light hand to incorporate it fully without deflating the mixture. Overmixing can make it runny.
- Layering with Care: Carefully spread the cream cheese mixture over the cooled pretzel crust. Use an offset spatula or the back of a spoon to spread it evenly all the way to the edges. This creates a vital seal, protecting the crust from the Jell-O layer.
- Crucial Chilling: Refrigerate the cream cheese layer for at least 30-60 minutes before adding the Jell-O. This allows it to firm up, preventing it from mixing with or melting into the liquid Jell-O.
Mastering the Vibrant Strawberry Topping: The Refreshing Crown
The top layer of Jell-O and fresh strawberries brings the signature look and refreshing fruitiness to your
strawberry pretzel salad recipe. This layer often presents the most challenges if not handled correctly.
- Jell-O Preparation:
- Dissolve Completely: Ensure your Jell-O powder is fully dissolved in boiling water before adding cold water. Any undissolved granules can lead to a grainy texture.
- Less Water for a Firmer Set: For a sturdier, less wobbly top, consider using slightly less cold water than the package directions suggest (e.g., 1/4 cup less per box). This creates a firmer Jell-O that slices beautifully.
- Fresh vs. Frozen Strawberries:
- Fresh Strawberries: Always preferred for flavor and texture. Wash, hull, and slice them into uniform pieces. Pat them dry thoroughly to prevent excess moisture from diluting the Jell-O.
- Frozen Strawberries: If using frozen, thaw them partially but drain any excess liquid before adding to the Jell-O. They tend to release more water and can make the Jell-O layer softer.
- Temperature is Key! This is perhaps the most critical tip. The prepared Jell-O mixture (with strawberries added) must be cooled to room temperature, or even slightly chilled and thickened to a syrup-like consistency, before it's poured over the cream cheese layer.
- Why it matters: Pouring hot or even warm Jell-O directly onto the chilled cream cheese layer will cause the cream cheese to melt and potentially mix with the Jell-O, creating an undesirable marbled effect or, worse, compromising the cream cheese's integrity.
- How to achieve it: Place the Jell-O mixture in the refrigerator (or an ice bath) and stir frequently. Watch it closely until it's cool to the touch and just starting to thicken, but still pourable.
- Gentle Pouring: Once the Jell-O is properly cooled and slightly thickened, gently pour it over the back of a spoon held just above the cream cheese layer. This technique disperses the liquid slowly and prevents it from creating divots or disturbing the cream cheese.
- Even Strawberry Distribution: Ensure the strawberries are evenly distributed throughout the Jell-O. If your Jell-O is perfectly cooled and slightly thickened, the strawberries are less likely to sink to the bottom.
- Final Chill: Refrigerate the entire salad for at least 4-6 hours, or preferably overnight, to allow the Jell-O to set completely and all layers to meld together. If you're looking for a tried-and-true Easy Classic Strawberry Pretzel Salad Recipe, mastering this topping is key for that perfect slice.
Presentation, Make-Ahead & Storage Savvy
Even after all the effort, how you finish and store your salad impacts its enjoyment.
- Clean Cuts: For clean slices, run a sharp knife under hot water, wipe it dry, and then make your cut. Repeat for each slice.
- Garnishes: A sprig of fresh mint, a few extra strawberry slices, or a dollop of whipped cream can elevate the presentation.
- Make-Ahead Tips: Strawberry pretzel salad is an excellent make-ahead dessert. You can prepare it a day in advance, which gives it ample time to chill and set perfectly. This also means less stress on the day of your event.
- Storage: Keep leftover salad tightly covered with plastic wrap in the refrigerator. It's best enjoyed within 3-4 days. After that, the pretzel crust may start to soften significantly. For a slightly different approach or to explore variations on this beloved dessert, you might also enjoy our Sweet & Salty Strawberry Pretzel Salad Recipe.
Conclusion
The perfect
strawberry pretzel salad recipe is a testament to the art of layering and temperature control. By paying close attention to each component—from the crispy, salty pretzel crust to the creamy, tangy cheese layer and the vibrant, fruity Jell-O topping—you can transform a simple dessert into an extraordinary culinary experience. Embrace these tips and techniques, and you'll be well on your way to creating a strawberry pretzel salad that will earn rave reviews and become a cherished staple at all your gatherings. Enjoy the process, and savor every delightful, perfectly balanced bite!